I was thinking I wanted to handle container environments easily, and caught wind that “incus, a fork of LXD, seems nice”. It seems development is proceeding independently from Canonical, and it’s been getting attention gradually recently.
So this time, I summarize the flow of installing incus on Ubuntu 24.04 LTS and finishing initial settings as a memo for myself. I tried up to introducing GUI, so I hope it serves as a reference for those wanting to touch it from now on.
Install Incus
In this section, I list tasks until incus initialization is complete.
- Install Host OS
- Install incus
- Initialize incus
Install Host OS
Since incus, like LXD, seems stable on Ubuntu, I chose Ubuntu 24.04 LTS simply this time.
If you want to operate as a server, setting a static IP during installation makes accessing via SSH or GUI later incredibly easier.
I configured the file system as follows:
/boot/efi: fat32 (ESP)/boot: ext4 (A bit anxious with btrfs here)/: btrfs (Want to utilize in incus)
If you want to use btrfs, it’s better to format it at this point.
Install incus
Install from the following repository.
Incus package repository. Contribute to zabbly/incus development by creating an account on GitHub.

Ref: https://linuxcontainers.org/incus/docs/main/installing/#linux
# Add repository keysudo curl -fsSL https://pkgs.zabbly.com/key.asc -o /etc/apt/keyrings/zabbly.asc
# Add repository (6.0 LTS)sudo sh -c 'cat <<EOF > /etc/apt/sources.list.d/zabbly-incus-lts-6.0.sourcesEnabled: yesTypes: debURIs: https://pkgs.zabbly.com/incus/lts-6.0Suites: $(. /etc/os-release && echo ${VERSION_CODENAME})Components: mainArchitectures: $(dpkg --print-architecture)Signed-By: /etc/apt/keyrings/zabbly.asc
EOF'
# Install incus and GUIsudo apt-get updatesudo apt-get install incus
Initialize incus
Once installation is complete:
sudo incus admin initYou will be asked the following, so configure according to your situation.
Would you like to use clustering? (yes/no) [default=no]: yesWhat IP address or DNS name should be used to reach this server? [default=192.168.100.101]:Are you joining an existing cluster? (yes/no) [default=no]: noWhat member name should be used to identify this server in the cluster? [default=incus1]:Do you want to configure a new local storage pool? (yes/no) [default=yes]:Name of the storage backend to use (dir, lvm, btrfs) [default=btrfs]:Would you like to create a new btrfs subvolume under /var/lib/incus? (yes/no) [default=yes]:
Do you want to configure a new remote storage pool? (yes/no) [default=no]: noWould you like to use an existing bridge or host interface? (yes/no) [default=no]:Would you like stale cached images to be updated automatically? (yes/no) [default=yes]:Would you like a YAML "init" preseed to be printed? (yes/no) [default=no]:
Install GUI
In the zabbly version of incus, UI (incus-ui-canonical) is also provided. Appearance is almost same as UI for LXD, just commands swapped for incus.
Fork of canonical/lxd-ui for use with Incus (gets rebased frequently) - zabbly/incus-ui-canonical
In this section, I explain up to installation and initialization of GUI.
Install incus-ui-canonical
Assume zabbly repository addition is done during incus installation.
sudo apt-get install incus-ui-canonicalAccess incus-ui-canonical
Check GUI IP with following command.
sudo incus config get core.https_addressAccess via browser to the IP confirmed in settings. If screen like below appears, success.
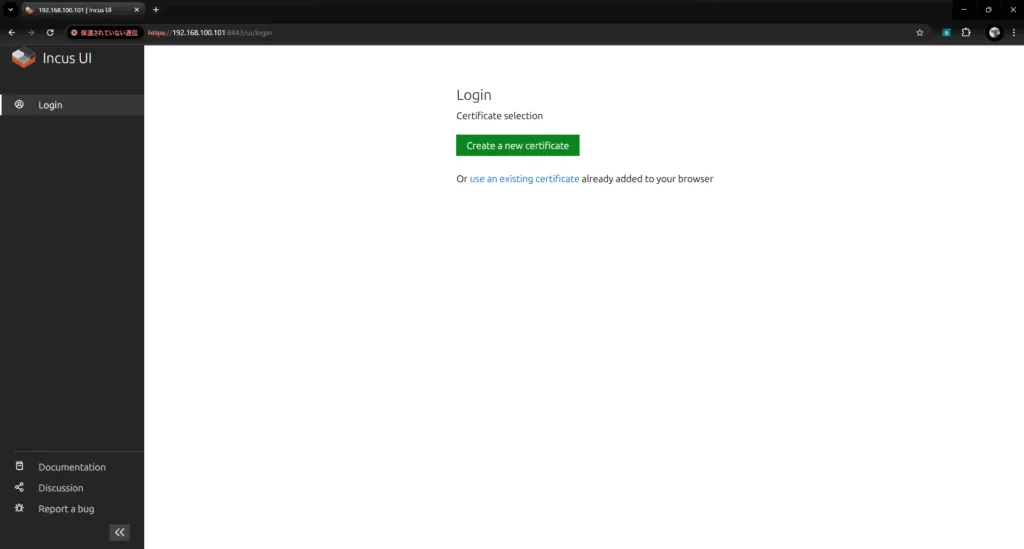
Connection Settings for incus-ui-canonical
Instructions are on screen around here, so you should just follow them.

scp /mnt/c/.../incus-ui.crt username@[ip_address]:/home/usernameConfirm Login
Once certificate installation is complete, restart browser. Accessing GUI again should display the post-login screen.

Conclusion
For now, I completed introducing incus on Ubuntu 24.04 LTS and building an environment manageable via GUI. Now that initial settings are done, I think I can proceed to actual operation phase like creating containers, network settings, customizing profiles etc.
Trying to create actual environments or operating in cluster configuration will be themes for next time onwards. If interested, please come again.